![[Next]](../buttonNextI.jpg)

|
|
FS2002 Autopilot - Getting To Know George |
|
FS2002 Autopilot Procedures by Brett I. Holcomb |
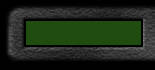
Wing Leveling - Holds the wings level (no heading control). Yaw Damper - Dampens out yaw to keep the tail from swinging. Altitude Hold - Keeps the aircraft at a given altitude. Heading Hold - Keeps the aircraft on a given heading. Airspeed Hold - Keeps the aircraft at a given airspeed. Mach Hold - Keeps the aircraft at a given mach number. TOGA Control - Take off/go around mode. Automatically advances the throttles for takeoff or go around. Nav Tracking - Tracks input from the Nav radio or GPS. Approach Tracking - Tracks localizer/ILS/backcourse depending on selection. Some of the functions are exclusive: for example, you can't have heading hold on at the same time as wing leveling. Depending on the aircraft, the autopilot in Flight Simulator 2002 (FS2002) will look different; in some aircraft it's part of the radio stack (Cessna, Mooney), while in others it's part of the main panel (B737, Kingair, B747, to name a few). Figure 1 at the end of this tutorial shows screenshots of some of the autopilots in FS2002. Although they look different, they all perform the same functions. (Note that some autopilot functions are not available on some of the aircraft.) The overall procedure for using an autopilot is as follows (I'll cover the details later): Using the Boeing 747-400 autopilot as an example let's go through each of the functions. These will be available on almost all aircraft but they may be in a different place, have slightly different labels (such as 'A/P' instead of 'CMD') or look slightly different. To get the most out of this guide, you might want to get the 747-300 up to a safe altitude (either by flying it there or slewing) and then save the flight. Then try each of the steps given. The simplest function of an autopilot is to serve as a wing leveler. In this mode the autopilot simply keeps the wings level; whether or not the aircraft maintains altitude or airspeed depends on the pilot. Some autopilots go into wing level mode as soon as you turn them on (assuming heading mode is not selected), while others - such as the B777 and B737 - have a button to enable the wing leveler function. The yaw damper function eliminates unwanted yaw (movement around the vertical axis, swinging of the tail). For aircraft that have this feature - such as the KingAir - simply turn it on by clicking the 'Y/D' button. Attitude hold simply keeps the pitch attitude at whatever it was when the autopilot was turned on. This function does not have a button in FS2002. Use the keys CTL + T. A more complicated function is heading. The autopilot elements that relating to heading are shown in below, outlined in red boxes. There is a set of thumbwheel switches to set the heading, a knob to turn that increases or decreases the heading, and two buttons: one to tell the autopilot whether to use the heading dialed in or to use the NAV/GPS system; and one to provide heading information. First, dial in the heading you want (in this case 360) using one of several methods. These methods can be used on most of the autopilot functions so they will be given here once and not repeated for each function. Second, push the button labeled 'HDG' to the left of the 'SEL' knob. On the Boeing 747-400 the button will show a yellow bar and the heading function will be ready for use. To allow the autopilot to control the heading, push the button labeled 'CMD' (it's outlined with a small box in the picture below). This turns on and enables the autopilot. If you do not turn on the 'CMD' button the autopilot will just sit there and do nothing. (See the Notes section at the end of this tutorial for additional information on the heading and wing leveler function.)
For some aircraft you use the heading bug on the directional gyro ('DG') instead of thumbwheel switches. The KingAir works the same way except that you adjust the knob at the bottom left of the Horizontal Situation indicator ('HIS'). See the pictures below.
Now let's take the altitude hold function, which is used to keep the aircraft at a constant altitude. The autopilot controls that relate to altitude hold are outlined below in the red rectangle. There are two sets of controls - one for the altitude itself and another for the vertical speed. If you are not at the desired altitude you have to set the vertical speed that you want to ascend or descend to.
The airspeed and mach hold functions are closely related. Normally, airspeed is used to display the plane's speed until it gets to an altitude high enough that compressibility and other effects make airspeed inaccurate. At that point mach number is used for speed indication. To set a target airspeed or mach number, do the following:
To track navaids, the autopilot works in conjunction with the navigation radios or the GPS. To use the nav radio a switch on the aircraft panel is set to 'NAV' (on the 747 the switch is just above the multifunction display, while on the 777 it's on the engine instrument and crew alert display). In FS2002 only, nav radio 1 can be used by the autopilot to fly a course. If 'GPS' mode is selected you can't rotate the OBS knob or set a course in the HIS using the autopilot. If you need manual control of the display, move the 'GPS/NAV' switch back to 'NAV'.
Approach tracking is the same as nav tracking except that the autopilot will track the ILS, localizer, or back course approach set into nav radio 1.
Takeoff/Go around mode (TO/GO) allows the autopilot to take the aircraft off or execute a go around. In this mode the autopilot advances the throttles and pitches the nose up to a preset value. The auto throttle must be armed for this mode to work. TO/GO mode is selected by a button on the throttle quadrant. Notes Some additional suggestions for the FS2002 autopilots:
|